Why make upgrades?
If you have a notebook/laptop computer, such as the Dell Inspiron series, you probably have found that you are running out of space on the drive, the boot drive has way too small capacity, the drives are too slow and use too much battery power. You may also find problems with crashes or slow performance due to too little memory. In the months or years since you purchased the computer, memory and drive prices have decreased and performance has increased. This means you can buy superior replacement components for much less than you could have when you originally bought the computer.
It's easy and inexpensive to upgrade
You may not have made any upgrades believing that it is too complicated or risky. I can show you that this is just not true. Anyone with basic technical skills and some common sense can do this. There are generally only 3 components in a laptop or notebook computer that you can easily replace or upgrade. These are:
- Battery
- RAM (memory)
- Drives
Equipment and costs - Example Dell Inspiron 15 model 7559
These are the approximate costs for the Dell 7559 as of late 2019. If anything, these prices will likely decrease as time goes on. The easiest way to get reliable replacement parts at the best price is to search in Amazon for the name, make and model of your laptop and include any specifications about the part. I always confirm but looking inside my laptop.
Opening the laptop
Every laptop is different, you just Google the name, make and model of your laptop and "How to open" and you will find plenty of websites and YouTube videos showing you how. In the case of the Dell 7559, there is only 1 screw in the middle of the back panel to loosen with a phillips screwdriver (the screw remains in the panel) and then to use your fingernails to pry the panel off. In addition to the screw, it clips into place (you just pry it out, the clips then release)
Here's what it looks like.
Battery
Searching in Amazon, we find the following 74 Watt replacement. Since the battery is screwed in place inside the notebook, with no direct access outside, you can't put a larger batter in, just replace it with an identical model. But since batteries perfomance decline over time, this is a valuable improvement.
Drive replacement
Each laptop model has a different configuration. Some have 1 drive with an empty slot, some have 2 drives both occupied, some have 2 mechanical drives, others 1 SSD and one mechanical drive. It really doesn't matter, all are easy to upgrade and replace.
In my case, my Dell 7559 had one SSD a "Hynix" 128GB M.2 SSD and one mechanical drive (1 TB). My problem was the Hynix SSD was running out of free space and since it is the boot drive, sooner or later my system would start crashing. And no, you can't simply move files to the other drive; that becomes messy and complicated. a much better long term solution is to just replace the boot SSD with a larger (and more reliable) SSD.
Obviously, you must replace the drive withthe same form factor. An M.2 SSD has an edge connector with 2 small (5 or 6 pins) tabs on each side of a center wider connector. I chose the Samsung SSD 860 EVO 1TB M.2 SATA Internal SSD (MZ-N6E1T0BW) available on Amazon. You will also need an enclosure (also show at right) in order to connect the drive to your laptop to clone the old drive to the new.
Boot Drive
Procedure
- Attaching the new SSD
You simple put the new drive into the enclosure and connect it to the laptop.
Next, you need to format the new drive, before the laptop will recognize it. The drive has directions for this. - Download the cloning software
There are good free ones available. Here are several:
Macrium free cloning tool made for Hynix SSDs: https://www.macrium.com/sk-hynix :
Macrium Reflect 7 Free Edition Home edition (I used this one, simply because I did not notice they had the one above): https://www.macrium.com/reflectfree
AOMEI Partition Assistant Standard Edition: https://www.disk-partition.com/help/clone-hard-disk.html - Clone the drive
This is unbelievably easy, just follow the directions in the software.
Note: if it fails, just go through the cloing process again. Once in a while it takes 2 or 3 tries. - Swap the drives
Power the laptop down
Open the back
Gently remove the old drive (again, you can google how to do this for your specific model.)
Put the new (cloned drive) in.
Re-close the back - Power up the system.
If all went well, it will power up, load Windows and you're back in business. - Check space
Go to Windows file explorer, "This PC" and see if the all of the new drive's space is available.
In my case, the extra space was made as a separate drive letter (E), and the new drive and the boot drive (C) were not adjacent (contiguous), so I couldn't merge them using Windows 10 built-in disk management tools.
No problem, the AOMEI free tool merged them quickly and eaily; see https://www.disk-partition.com/articles/merge-partitions-without-losing-data-3889.html
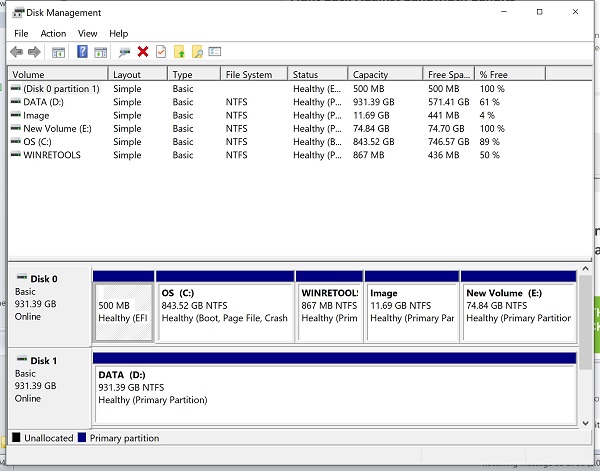
At right is what my partion looked in Windows 10 Control Panel ->Disk Management, after I merged the volumes.
I left 75GB in the "New Volume" just in case I decided to move it into one of the other partions later.
Data Drive
You can do the same procedure for the mechanical hard drive in the other slot. In most systems, this is a normal 2.5 inch SATA drive (not an M.s SATA, as is the boot drive in the Dell 7559 laptop)
You can see it in the Disk Management window at right.
It's even easier to replace this drive. I like Apricorns cloning kit, which includes a SATA to USB cable and the cloning software, but really, you only need the cable and you can use Macrium Reflect 7 Free Edition Home edition: https://www.macrium.com/reflectfree . There should be no issues with partions, since this is a simple data drive.
The best replacement drive for the 2.5 inch slot, in my opinion, is: Samsung SSD 860 EVO 1TB 2.5 Inch
SATA III Internal SSD (MZ-76E1T0B/AM)

I have about a dozen Samsung EVO SATA 2.5 inch drives in use since 2014. None of them have ever failed. Some are in use 18 hours a day, every day. I have had Patriot SSD's that failed and the same with Crucial and Corsair. I'm sticking to Sansung EVO's. Just look at the reviews online.
It is incredibly easy to replace the data drive using the Apricorn kit, which iincludes boith the cable you need to connectthe drive for cloning and the clonming software. Of course, if you already have a SATA to USB cable, you can just download the free Macrium software.